top of page
JACKI BOSS
ARTIST
COMMUNITY PROJECT
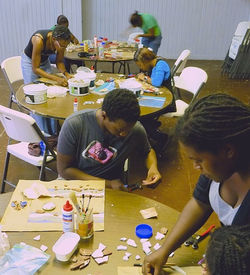 An open call for participants to join the Mosaic Floor-Scape Community Project went out in September, October and November, 2012. By the time the project was completed, twenty artists and non-artists had contributed to creating the stones for the mosaic with another fifteen people volunteering on behind-the-scenes tasks in preparing for it's initial viewing at the art exhibition, in May 2013. |  Most materials gathered were via donation or found in garbage sites requiring a quick wash of soapy water and bleach before further handling. |
|---|---|
 Templates for the border were hand-drawn within a 14" square - the size of the final "stone". Participants were directed to follow the pattern, with a section in the middle optional to create their own "Caribbean" design. |  Tiles or glass were either broken, or hand-cut to shape, using special mosaic hand-tools. To create concrete stones, the "indirect method" of mosaic was implemented. The tesserae are glued face-down onto the template so, the undersides are exposed to the concrete forthcoming. |
 The main image was worked on as a single unit cut into 14" squares, to ensure "flow" between the individual stones. |  Broken pieces of tile were laid out on the main image drawing to determine color assignment. |
 The assigned pieces were then hand-cut to fit inside the drawing's shapes - minding attention to width of future grout lines. Denser materials like granite, marble and some floor tiles had to be broken down with hammer and chisel. |  Notice the drawing of the image in this photo - for the indirect method, all work is done in reverse ! |
 Completed templates were transferred into 14" square forms. To prepare for concrete, sand was carefully brushed to fill in-between the tesserae pieces. This step prevents the concrete from seeping fully to the bottom of the form, leaving room for grout when the stone is removed, and turned right-side up. |  Concrete was prepared by hand, for templates ready in forms in batches of six to ten. |
 The concrete was left to set in the forms for three to four days. Like a cake from a cake pan, the form is flipped over and the concrete stone is removed. To expose the surface of the mosaic pattern, the brown paper template is moistened to dissolve the glue and is scraped away. |  The concrete stones are laid out to fully cure an additional three to four days before the grouting process. |
 All sand is vigorously brushed out, and any tesserae that did not survive the process to this point, is set back into place before grouting. | 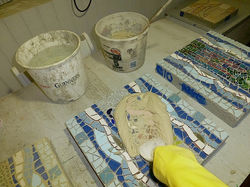 The border and main image were grouted in different colors to enhance the overall design. |
 From mixing grout to polishing, a grouting session would take about three hours. | 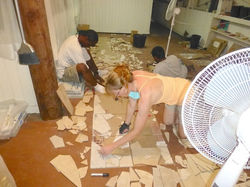 All steps were repeated until the mosaic was complete... 150 stones in all over eight months! |
 The last concrete-pour occurred in April, 2013 and the mosaic was displayed briefly at the art exhibition in May, 2013. |  After exhibiting the community project in an art exhibition in May, permanent installation of the mosaic floor-scape began in the fall of 2013. Jacki Boss prepared the blueprint and model of the concrete base for the construction team. After it was poured and set to cure for thirty days, the stones were transported to the site and installed over a three-day period. |
 The grouting process involved another full three days. Final polishing of the installed artwork was completed on November 30th, 2013. |  The artwork was inaugurated with a second unveiling December 14th, 2013 courtesy of the Grand Bahama Port Authority. It's permanent home is centrally located at Port Lucaya's Marketplace, Freeport, Grand Bahama Island. |
Click on any thumbnail to enlarge image; scroll over larger image for information.
bottom of page